August 10, 2012

Love Jar

ARG!!  
My kids are driving me crazy with the constant fighting, biting, kicking, hitting, pinching, tattling... you get the picture.  
Summer is great, because we all get to hang out together and do fun things, but it is also a time of rediscovering sibling (and parental) dynamics!  
My kids haven't spent this much time together in a year, 
since Aria started Kindergarten!  
And now they're together from morning to night.  
So what's a mom supposed to do about it?  
I didn't really sign up to be a peacekeeper this summer!

Last summer on Pinterest I saw lots of ideas about the "I'm Bored" jar, and I thought that's a nice idea, but I don't hear "I'm bored" very often (probably because my kids are too young to be familiar with that concept, thank goodness!).  But it occurred to me that that idea could work as a "discipline" method, or a way of solving the constant bickering!  
So we made a LOVE jar.
Its chalk full of ways to change gears from fighting to loving (and forgiving). 
A lot of the time kids just need to have their focus shifted if they aren't getting along.  So, we made the list together, and each time I hear the "He bit me", "She punched me", etc. they have to pull a slip out of the jar and do what it says.  I tried to keep things simple because my kids are 3 and 6 years old.  As well, I tried to keep the activities to be self-directed (so I can keep doing whatever I'm working on, as the whining usually starts when I'm in the middle of something!), and a good mix of fun ideas, loving ideas, and some discipline ideas... to keep them on their toes!

Here's a list of what we included:
Hug for one minute
Play badminton
Jump through a sprinkler holding hands
Make a waterslide together, and take turns using it
Clean up Roscoe's room
Clean up Aria's room
Brush the dog
Play Ring Around the Rosie
Hug for two minutes
Time out for two minutes
 Give a high five
Sing "Where is Thumbkin"
Sing "Johnny Whoops"
Sing "Old MacDonald Had a Farm"
Dance party for one minute
Say 5 nice things that you like about each other
Pray for each other
 

Love one another the way I loved you. This is the very best way to love.
John 13:34

August 5, 2012

Its an Olympic Summer!

 The Olympics this summer have been providing a great sense of direction for the kids and I over the last two weeks.  Sometimes I get to the middle of the summer, and I think, "Yikes!  What are we going to do now???"  Maybe its the age of my kids this summer, and how much more capable Roscoe is or something, but I've hardly thought that!  We've been going to the beach a lot, and had family visiting, and so much more.  All the same, I love working within a theme, my kids love having a craft to look forward to every couple of days, and the honest truth?  I just need an excuse to start another Pinterest board (check out my Olympics Kid Fun Pinterest board)!!!
 So, last week we did a great painting activity using toilet paper tubes to paint the Olympic rings.  Have to say, pretty low mess, and easy clean up (I threw the tubes away... no washing brushes!).
 As we painted I talked to the kids about how everything always points back to Jesus' love for us: nature, the seasons, the Olympic rings...
BLACK reminds us of our sin, all the bad stuff we do, say or think.
RED is for the incredible LOVE that Jesus has for us, and because he loves us, he died for us, shedding his blood and taking our punishment, 
that we deserve for our sins.  
He loves us that much!
WHITE is for forgiveness.  For saying that we're sorry to God and others for our bad choices, and having our sins cleaned off us, forever!
GREEN is for new life, for the new, fresh start we get to have 
because of being forgiven: freedom!
YELLOW is the hope that we have of spending the rest of our lives 
with our true best friend, Jesus, every day.
BLUE is for telling others about Jesus and his love.  
One way we can do this is through baptism, 
as well as through our kind words, kind hands (actions) and kind thoughts.

 On another day we were watching tennis with the kids, and thanks to my Pinterest board, I had organized several crafts ahead of time for us to do, and pulled out this beauty!
 Little Tennis Puppets!  Aren't they cute?  We used supplies that I had around the house: pompoms, googly eyes, and feathers.  The kids had fun picking out the colours and then I glue-gunned them on to the balls.  
The puppets are great for storing treasure in too!
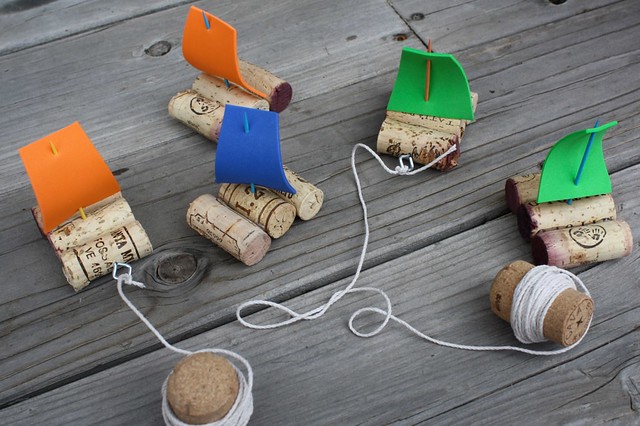
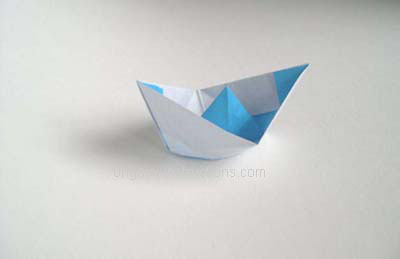
We've also built different models of boats to test which ones float the best, but were too busy having fun to take pictures!  Here are some of the ideas we used from other blogs:

August 4, 2012

Little Mermaid Party - Aria Turns 6!

Yes, this post is a little slow in coming!  The party was way back in April, but... better late than never!  Right?  So, apparently April is a busy birthday month for Aria and her friends!  It was a challenge finding a day that worked for everyone, and I think most weekends in April had a party scheduled!  We ended up combining Aria's party with one of her closest friends, Stella, as their birthdays are only a week apart, and I'm SOOO glad we did!  It was such fun!
Stella's mom and I were talking one day, and we quickly realized we should just combine the parties, as both girls wanted a mermaid party
both girls had the same friends they wanted to come, 
and neither of us moms thought the friends should bring gifts!  
So instead we had a loonie and twonie party, where the birthday girls had little treasure chests that their friends filled with money!  Aria needed a new bike this year, so her money went towards that purchase.
 
 I had been planning Aria's party for several months already, as I really enjoy the creative end of decorating and planning towards a good theme!  
So I took care of hosting, decorating and some food, and Stella's mom made a super fun cake!
 There are so many great ideas out there for doing a mermaid party, 
and the trouble is focusing in on only a couple ideas.  
We decided to go with a turquoise, purple and green colour scheme, 
and then started finding decor that fit in with that!  
Aria and I had fun shopping for jewels and stones and shells at the dollar store to decorate the table.  And then Superstore had plastic dishes for outdoors this spring in a great turquoise, and for super cheap!
 I've decided that as cute as cake-pops are, 
dipped marshmallows are WAAAAY easier, 
and just as big of a hit with the kids!  
So we used some purple dipping chocolate and the purple sprinkles 
(left over from last year's Tangled Party) for those!
 The mermaid tail towels were an awesome take-home/thank you gift for the guests, and doubled as chair decor!
 I found this fish net at the dollar store and filled it with balloons for an under the sea theme in the living room.  
The starfish were made with sandpaper (again, courtesy of the dollar store), and I made the tissue paper flowers - super easy!  

Just use about 8 sheets of tissue paper, 
accordion fold it, 
use a twist-tie in the middle to hold the folds together, 
shape the two ends (I rounded them off, or cut a a triangle), 
and then fan them out.
  
 My hubby helped out by making these super cute "sushi" sandwiches.  He spread cream cheese on slices of bread, and then put sliced cucumber, cheese, and ham in them, rolled them up and cut them into rolls.
 Here's our new pet fish that acted as a centrepiece on the party table!
 Isn't that cake so cute?!  
The birthday girls got to keep the mermaid dolls that were on top.  
I made the ruffled streamers the night before.  Again, super easy!  

Double up the streamers, and then force them into the sewing machine, allowing them to bunch as you sew to get that ruffled look.  
And then cut them to the length you want them.  
The more imperfect the better!

 The birthday girls!
 I ended up not planning much for party activities, which turned out to be a good thing, as the girls were happy to play barbies for the whole party!  I think thy really enjoyed just being together, without the school agenda to contend with!  We did play musical chairs to the Little Mermaid soundtrack, which progressed into a full-on Mermaid dance party!
Our six year old!  Where has the time gone!  
And now starting into grade one in less than a month.  
I can hardly believe it! 

Mermaid Tail Pseudo-Tutorial

DISCLAIMER: I say this is a "pseudo-tutorial", because I don't want to claim if you follow my directions step by step it will end up a certain way!  I am definitely NOT a seamstress, and when I do sew, I would say that I am an "interpretive-sewer" (kinda like interpretive dance??!)  That being said, I saw the idea for a mermaid beach towel, and thought, "I could make that!", and I did, for about $5 a towel!  Not bad!
 So, first off, I went to WalMart, 
and found towels at $5 a shot in the colours I wanted (purple and turquoise), one towel per child (I needed 6: so 3 purple, 3 turquoise).  
I chopped the bottom third off each towel, 
and then I made a fin template using tissue paper.  
I folded the tissue paper in half, drew half a tail freehand, cut it, opened it up and voila!  A perfectly symmetrical fin!  
I pinned it to a the bottom third of the towel that I had cut off, and cut around it, leaving a 1/4 to 1/2 inch for the seam allowance (a trick I learned in pattern making from the UVic Theatre Costume department!).
 Then, as I am not much of a seamstress (as mentioned above), I waited to do the actual sewing until I was at my in-law's house in March, because my mom in law is a fabulous seamstress, and often takes my crazy ideas and figures out how to make them work!  We serged the fins (an easy job for me!), and then she and my sister in law figured out a way to use crochet string (not yarn) to gather the unfinished edge of the top two-thirds of the towels in order to sew them to the fins.  Are you with me still??
 Here's the finished product!  
After the visit, I took the finished towels home and attached velcro to the top of each tail so the girls could wear them!
 Here's my husband's mom and sister hard at work on my crazy scheme...
And here's the finished product, modeled by the birthday girl.  
The towels were a huge hit at the party, and a great 
take-home gift instead of a goody bag!  
It was super cute seeing them all wearing their towels 
while they played barbies at the party.